

Trapped
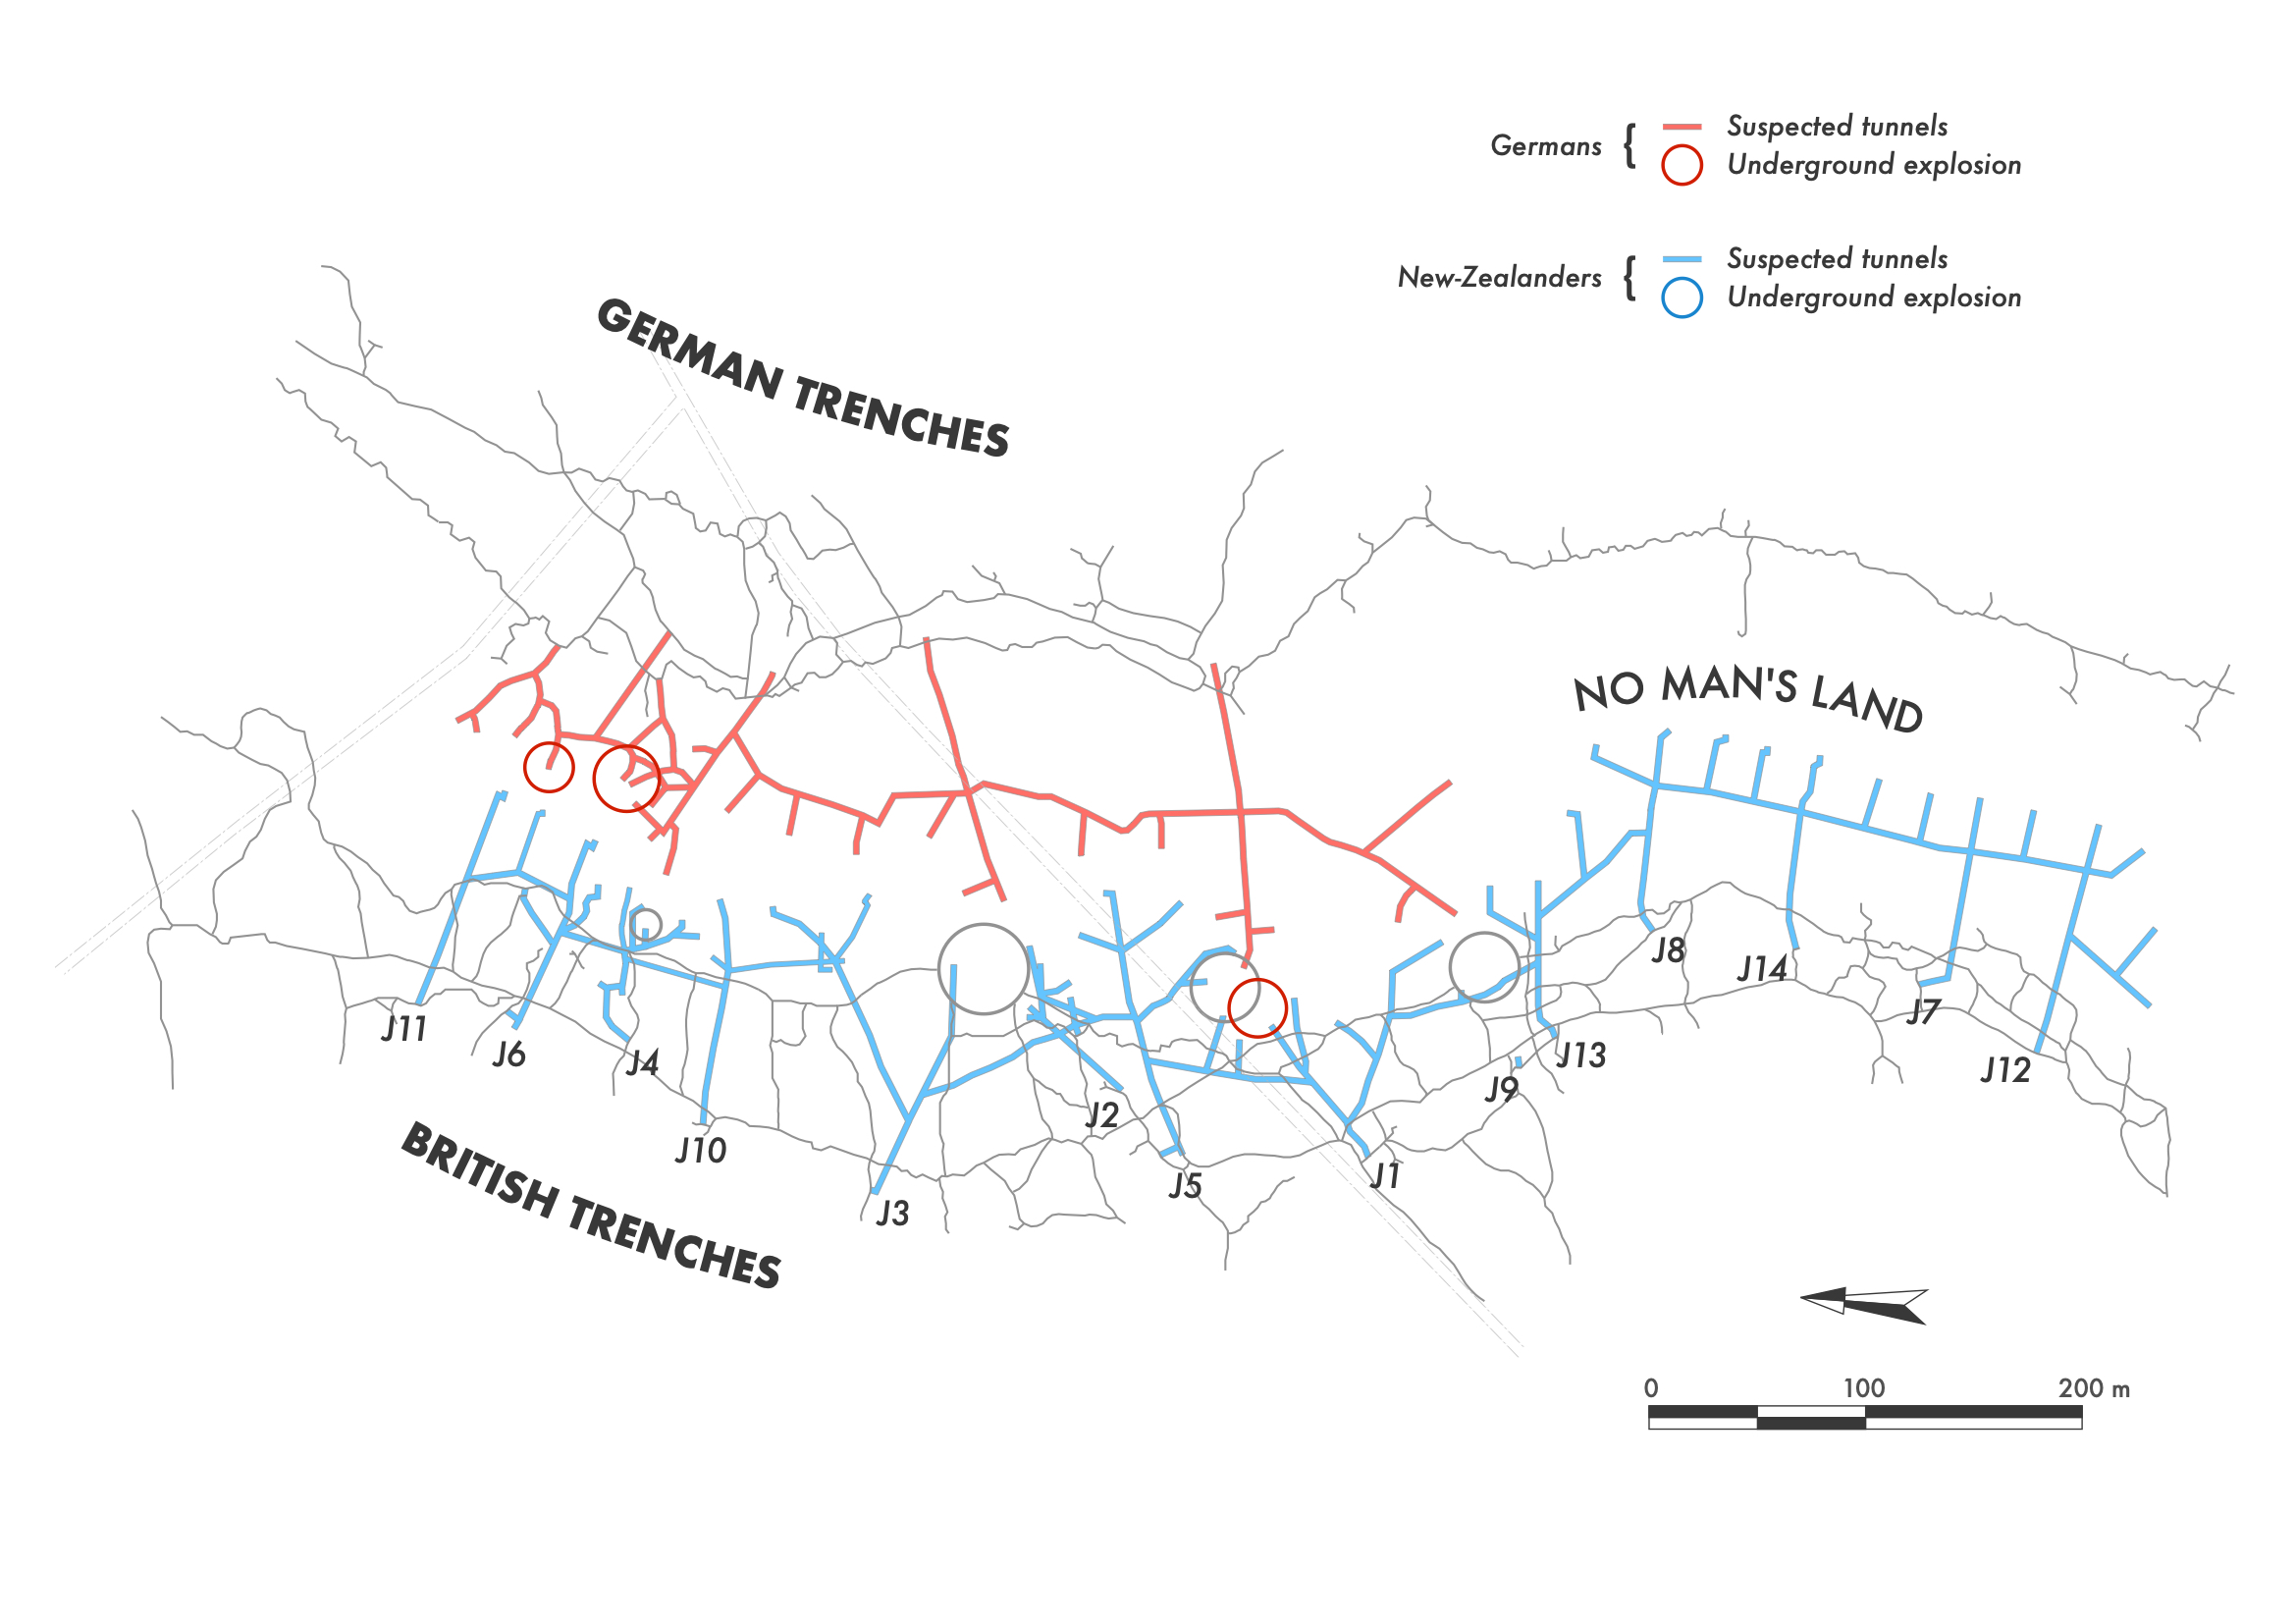
Despite their success underground, the German miners no longer seemed as confident in their actions. They detonated several camouflets near their own lines for no apparent reason. The first was fired on 18 June 1916 at 5:00 a.m., north of Chantecler, close to Sector K. The next day, another explosion was felt, again in front of the German lines.[1] The tunnellers were not operating at that part of the front: their galleries did not even reach halfway across no man’s land. An error in interpreting the listening results was probably behind this move. Being too far away, these camouflets caused no damage to the New Zealand tunnels. The Germans nevertheless persisted. Two more camouflets were set off in the same area on 27 June and 1 July (Map 6). They caused no damage to the New Zealand network. The Germans may have been trying to prevent the tunnellers from pushing farther forward by destabilizing the ground at a point where the two opposing front trench lines narrowed and drew closer together.
The company’s work resumed quickly despite the absence of Section 2, still operating in Sector G south of Arras. George was better off than his comrades in Sections 1, 3 and 4. The enemy was very quiet in his area of operations. The sapper listened more than he dug.[2] His comrade Gerald had been evacuated to hospital to undergo surgery for a benign tumour that was causing him pain. At Chantecler, the rest of the company continued expanding the network in two areas.
The first was the most difficult area, stretching from the junction of Sectors K and J to the Bailleul road. This was the section of the front where all the action had been concentrated since the New Zealanders arrived. Galleries were driven forward into No Man’s Land to reach the enemy system now located behind the three large craters (Map 6). The mines inspector of the British Third Army had met with the unit’s officers to devise an attack plan for this part of the front.[3] The New Zealanders could no longer remain passive.
The second area, more discreet, lay about a hundred metres south of the Bailleul road. No German miners had been detected there. The tunnellers continued building a defensive underground network, set 50 metres in front of the British trenches and made up of four main tunnels (J8, J14, J7 and J12) that extended as far as the middle of No Man’s Land (Map 6). All of them were linked by a lateral gallery nearly 300 metres long, dug parallel to the first line of British trenches, forming a true underground front. Several tunnels branched out between each main gallery in order to listen for and monitor the enemy. Above all, they made it possible to detonate a camouflet or a mine as soon as a German gallery approached.
On 14 July, the Section 2 handed over Sector G, as well as Sectors H and I (held by the 14th Pioneer Division), to the 256th Tunnelling Company, newly formed. On its arrival in the trenches, the 256th was placed under the authority of four officers from the more experienced 181st Tunnelling Company. Its baptism of fire did not take place, however, as its area of operations was calm. With the formation of this unit, the tunnellers’ corps reached its peak. Across the entire British front, the tunnellers' corps had reached its peak: 25 British companies, three each from Australia and Canada, and one from New Zealand—an underground fighting force of around 21,000 men.[4] George and Gerald were granted four days’ rest in Arras, then rejoined their unit north of Chantecler, where they relieved part of the men of the 184th Tunnelling Company in Sector K. The New Zealand unit was now fully assembled north of the Scarpe. George and Gerald were temporarily employed clearing trenches and installing underground shelters.[5] In Sector J, the tunnellers were short of “Fatigues”. Digging was reduced accordingly, and in early August the New Zealanders’ area of operations expanded again with the relief of Sectors G, H and I south of the Scarpe. The four sections now shared a front nearly ten kilometres long, from north to south of Arras.
At the northern end of Chantecler, the Germans were once again very active. But the most worrying development was the discovery of footsteps, located south of the Clarence crater, in the centre of the sector. Lacking manpower, the tunnellers did not have time to respond. On 14 August, at 10:05 p.m., a large mine exploded at that exact spot. The German miners once again managed to slip through the mesh of New Zealand tunnels. An oval crater more than 45 metres long and more than 36 metres wide formed, destroying on the surface 60 metres of front-line trenches that had been re-dug after the attack of 4 June (Map 6). The tunnellers working in the branches of galleries J5 and J1, enclosing the point of the explosion, got out quickly. As they raced to the surface, they extinguished all the candles. The tunnelling parties assembled in the trenches. Sappers as well as “Fatigues” were missing at roll call.
The officer in charge immediately alerted the nearest aid post as the list of missing men reached him. The rescue workers quickly gathered all the equipment and had it carried by infantry soldiers to the site of the attack. The rescuers therefore arrived in full physical condition for their intervention.[6] The officer directing the rescue operations ensured that the system was ventilated in order to drive out any gas present. No tunneller was allowed to go down into the damaged network. Guards were posted at the entrances to ensure security.[7] The infantry soldiers were formally forbidden to take part in the rescue operations. No gas was detected in the first tests. As a safety measure, the rescuers equipped themselves with their breathing apparatus and entered through the entrances to galleries J5 and J1. Each team went in as a pair.[8] To guard against igniting any gas still lurking deeper down, they used electric lamps rather than candles, placing them at intervals to light the route and mark the way back. As they advanced, the first signs of damage appeared—small falls of chalk at first, then the major cave-ins that would slow every step of their progress.[9] The rescue workers cleared the rubble to force a passage. The first casualties were freed: “Fatigues” who had not had time to escape during the partial collapse of the gallery. Taken in hand, the victims were gradually brought back up to the surface to be examined and treated. The injured were carefully laid on a purpose-built stretcher—entirely flexible from its plant-fibre fabric, fitted with four wooden skids for dragging through tunnels,[10] and designed so that a rope could secure the casualty for hoisting up a shaft. Each man was settled on his back, arms at his sides, legs together. Nearly a dozen Treillis were rescued in this way. The rescuers reached the two most badly damaged tunnels. The first showed numerous collapses over about 12 metres before being completely blocked. The second, which had taken the full force of the mine, had collapsed along its entire length. Despite all their efforts, the rescuers could not make rapid progress in either gallery. To move more freely, they abandoned their breathing equipment after confirming the absence of gas. In the middle of the night, a wounded tunneller was found in one of the branches. Others were still missing: Sappers James King and Joseph McCallum. The teams, who had been at work for several hours, were slowed by the extensive damage caused by the German explosion. By the morning of 15 August, the chances of finding the two tunnellers were diminishing. The operations continued all day without detecting the slightest sign of life. By nightfall, the tunnel was still blocked for almost 9 metres. The rescuers persisted tirelessly in their mission. As one of them carefully removed blocks of chalk, the body of one of the two sappers appeared. The face was pale. No pulse could be detected. The second was discovered shortly afterwards, also dead. The bodies of Sappers King and McCallum were brought to the surface almost 24 hours after the start of the rescue operations, while the tunnellers had already begun clearing their network. Some of the rescuers continued to secure the gallery and help with the clearing of the others. The rest packed away the equipment, but left some gear at the tunnel entrances in case it was needed. The men were now operating in a fragile section of the system.
The German miners did not only have the upper hand underground. They possessed a perfect knowledge of the terrain and of their opponent’s movements. On the other side of no man’s land, the New Zealand operations were not aggressive enough to force them back. In underground fighting, the best defence remained attack. Initiative always outweighed passivity. With manpower committed to underground warfare continuing to fall, the company found it increasingly difficult to carry out its mission. In early September, only two sections were fighting in sectors J and K. The other two were busy constructing underground shelters in the trenches at Saint-Nicolas. With the enemy virtually absent in sectors G, H and I, the company also abandoned its operations south of the Scarpe.[11] Rest periods had already increased in late August, from 16 to 24 hours; September brought a further adjustment—eight hours at the front and 16 in camp, with one team per section kept back for three full days. The rankers reacted very badly to the idea, but the officers quickly approved the proposal.[12] The NCOs and officers had no other choice, since this measure applied to all tunnelling companies. Apart from the risk of bombardment of their quarters, the men were above all resistant because of the increase in daily fatigue duties.
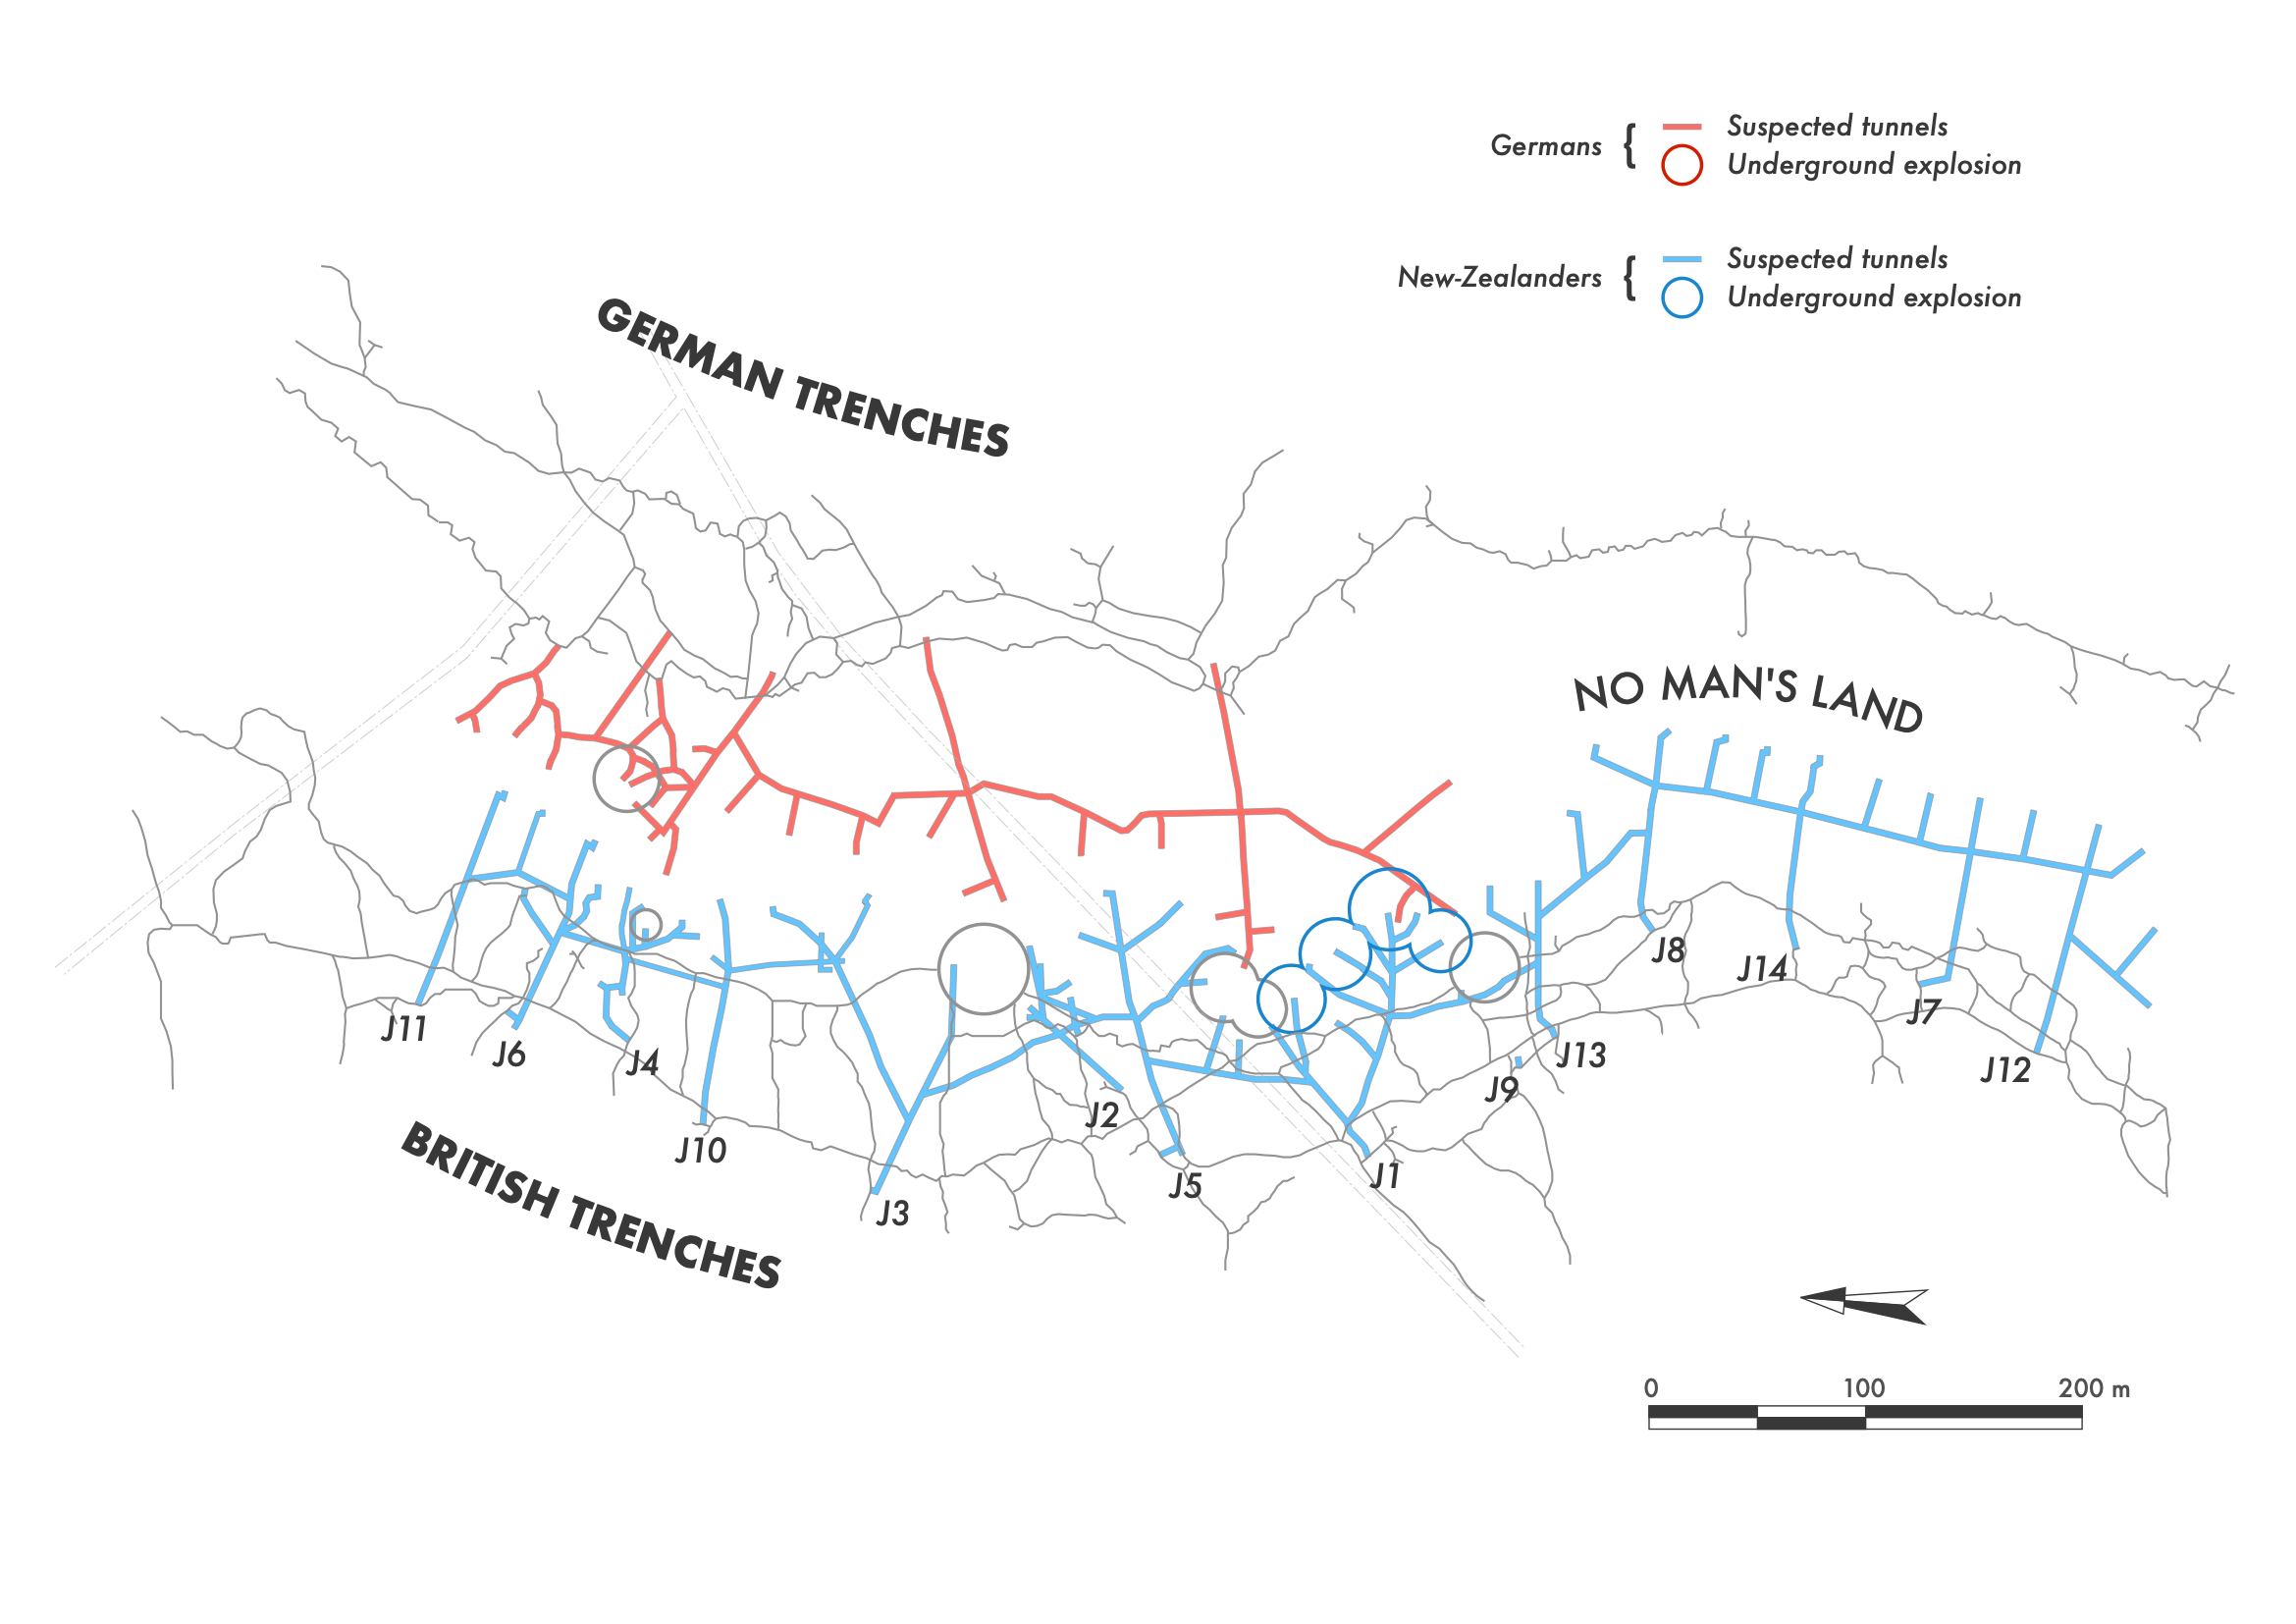
The New Zealanders decided on a counter-attack between Cuthbert and Clarence in order to clear the stretch of front where the Germans were most dangerous. The men of Section 4 were tasked with placing bags of explosive in four tunnels. They coordinated their action with the troops on the surface, those of the Cheshire Regiment. The infantrymen would open the way for a group of volunteer tunnellers who would create a breach in the enemy barbed-wire entanglements. They would then storm the German trenches, buying time for the tunnellers to blow, using small mines that were easy to carry, the entrances to the enemy’s underground passages.[13] Once blocked, the enemy network would fill with gas produced by the firing of the four camouflets, decimating its occupants. Jim, separated from his companion Lofty, who had been sent on leave, asked to be part of the team that would cross no man’s land. Jim joined Sappers Edwards, Pennell, Ormiston, Brooke, Ainslie, Milne and Cornwall, as well as Sergeants Pownceby and Leeden. The group was placed under the command of Lieutenant Durant. On 14 September, shortly before 8 p.m., the soldiers of the Cheshire Regiment assembled in the front-line trench, bayonets fixed. The volunteer tunnellers accompanied them. Beneath the trenches, the four gallery heads were ready to be fired. In total, more than six tons of explosives had been installed in this part of the underground system. On the surface, Jim ran into an infantryman he knew from having spoken with him before in the trenches, an Irishman living in Liverpool.[14] Lieutenant Durant gave his men his final instructions. If anything happened to him, the men were to obey Sergeants Pownceby and Leeden, or Jim if no NCO remained. Then everyone prepared to go over the parapet. At 8 p.m., the men dashed into no man’s land. The small group of tunnellers followed, mines in hand. They did not have time to cover more than twenty metres before a deluge of shells fell on all sides. Jim was trapped. He took cover with other comrades in a shell hole. Lieutenant Durant, Sergeant Pownceby, another Cheshire sergeant and three soldiers nevertheless managed to force their way to the enemy trenches. Jim dared to glance over the rim of his makeshift shelter. He saw only soldiers lying in the open, wounded or dead. The Irishman was there, lifeless. Aware of what awaited them if they stayed too long in the middle of no man’s land, Jim’s group fell back. The plan was abandoned. The four camouflets were fired seventeen minutes after the start of the offensive. All exploded successfully (Map 7). On the surface, nine tunnellers out of eleven were back in the lines, breathless and terrified. Few Cheshire soldiers were present. Jim, accompanied by Sapper Tom Edwards, decided to go back to retrieve the wounded, as well as his two superiors who were still missing. The two men quickly found a soldier lying in the open, alive but covered in blood. Jim carried him on his back and brought him back towards the trenches. The wounded man kept repeating: “Tell my mother I did my best.”[15] The poor man died before he could be taken in hand by the stretcher-bearers. The two sappers did what they could and gradually brought back other wounded men. The Germans continued to bombard the battlefield. Lieutenant Durant and Sergeant Pownceby were still nowhere to be found. In the darkness and confusion, no one had seen the two men enter the enemy trenches. Jim and Tom kept coming across more wounded men. They were carrying a soldier heavier than the others when a shell exploded in their path, blowing off Tom’s legs. Jim escaped almost by a miracle. He immediately brought his comrade to the stretcher-bearers, but his condition was critical. Sapper Edwards died an hour later.[16] The searches to find Lieutenant Durant and Sergeant Pownceby were futile and were called off in the middle of the night. The two New Zealanders were reported missing.
In this deadly game of chess, the German miners proved cleverer than their opponent. They managed to keep the upper hand underground through secrecy and through skilful diversionary manoeuvres carried out to the north of Chantecler. Twice, they dealt serious damage to British galleries and trenches. They even seemed to have anticipated the counter-attack launched underground and on the surface on the evening of 14 September. Deprived of any means and powerless, Jim did not hesitate to write in his small notebook that the Germans knew far more than his comrades about his unit’s operations. By the end of September 1916, the New Zealand network stopped expanding. The German miners were now very quiet. The tunnellers gradually abandoned the Chantecler sector for new work east of Arras, where the British Army was planning a major offensive against the German front lines.
Chapter 8
Right Under the Germans’ NosesNotes
- 1.
The National Archives United Kingdom, WO 95/407, New Zealand Tunnelling Company War Diary, 19 June 1916, “Germans blew another mysterious mine nearer their lines than Camouflet of yesterday and for no apparent reason.”
- 2.
Grant W. Grieve and Bernard Newman, Tunnellers: The Story of the Tunnelling Companies, Royal Engineers, during the World War, London, Herbert Jenkins Limited, 1936, p. 110, “… but the sector was reported to be very quiet”.
- 3.
Library of the British Royal Engineers, Weekly Reports – Third British Army, from 27 February to 29 December 1916. Weekly Reports 7-14 July 1916, “Now however that a concerted Mining offensive is indicated here this will have to be done.”
- 4.
Grant W. Grieve and Bernard Newman, Tunnellers…, op. cit., p. 110.
- 5.
The National Archives United Kingdom, WO 95/407, War Diary…, op. cit., 5 August 1916, “Our footage rather small on account of cleaning up trenches and making dugout in K [Sector].”
- 6.
The Work of the Royal Engineers in the European War, 1914-19, Military Mining, Uckfield, The Naval & Military Press Limited, 2004 (orig. ed. 1922), p. 82.
- 7.
Ibid., p. 83.
- 8.
Ibid.
- 9.
The National Archives United Kingdom, WO 95/407, War Diary…, op. cit., 15 August 1916.
- 10.
Military Mining…, op. cit., p. 66.
- 11.
The National Archives United Kingdom, WO 95/407, War Diary…, op. cit., 1 September 1916, “Our footage very small, as only two sections working in saps and one of these No.4 Section busy loading up J.1.1 and 1.14 - 3500 lbs. of Ammonal to go into each of those Galleries. No.1 and 3 Sections at work on Forward Dugouts at St.NICOLAS.”
- 12.
James Campbell Neill, The New Zealand Tunnelling Company, 1915-1919, Auckland, Whitcombe & Tombs, 1922, p. 55, “… it was not popular with our men, who were quite content to risk the shell fire to remain undisturbed in the comparative comfort of their Arras quarters.”
- 13.
Imperial War Museum, Documents.11515, The First World War Memoirs of James Williamson, Part 1, f° 40, “The idea was to take over miniature mines boxes about six inches cubic filled with ‘ammonal.’ […] When we got to the German mines, we had to throw them in to the sap heads and blow them up.”
- 14.
Ibid., “I knew a little chap in it. He was a Liverpool Irishman”.
- 15.
Ibid., Part 1, f° 42.
- 16.
Ibid., “He died an hour afterwards. Edwards was a hero that night”.
How to cite this page
Anthony Byledbal, “Chapter 7: Trapped”, in Kiwis Dig Tunnels Too, New Zealand Tunnellers, 2017. Available at: