


In the Heart of Battle
Wedged into one of the modest wooden bunk beds, Jim lay on his stomach, nibbling a piece of bread spread with marmalade that tasted of kerosene, with a small bit of cheese on the side. His unit’s billet had just been set up in Arras after the setbacks in the Labyrinth. The sapper, who had hung a few belongings at the end of his bunk, picked up his shirt and pulled it on. He was about to go on duty with the night shift. His comrades were still going about their business: while some dozed, others read or talked. Laughing heartily around a table, Lofty was playing cards with three other lads.
Shortly before 10 p.m., the fifteen sappers of the 1st team, 1st Section—Jim and Lofty’s team—assembled to head up to the front on foot. Led by Sergeant Clarke, they crossed the streets of Arras—a grim procession past gutted and collapsed houses—then struck north through the village of Saint-Nicolas and on along what remained of the Arras–Bailleul road, a long straight line pocked with shell-holes. Their sector, Chantecler, lay on the far side of the Scarpe, the canalised river skirting the city to the north, running between the villages of Roclincourt and Saint-Laurent-Blangy. Here, the trenches were the last remnants of the former French positions, even as new lines dug by the British were already beginning to appear. Jim and Lofty came to relieve one of the afternoon tunnelling parties, which had been at work from 3 p.m. until 11 p.m. They themselves would be replaced by one of the morning teams from 7 a.m. onwards. This system—rotating teams on eight-hour shifts—kept the fight going continuously, twenty-four hours a day, seven days a week.
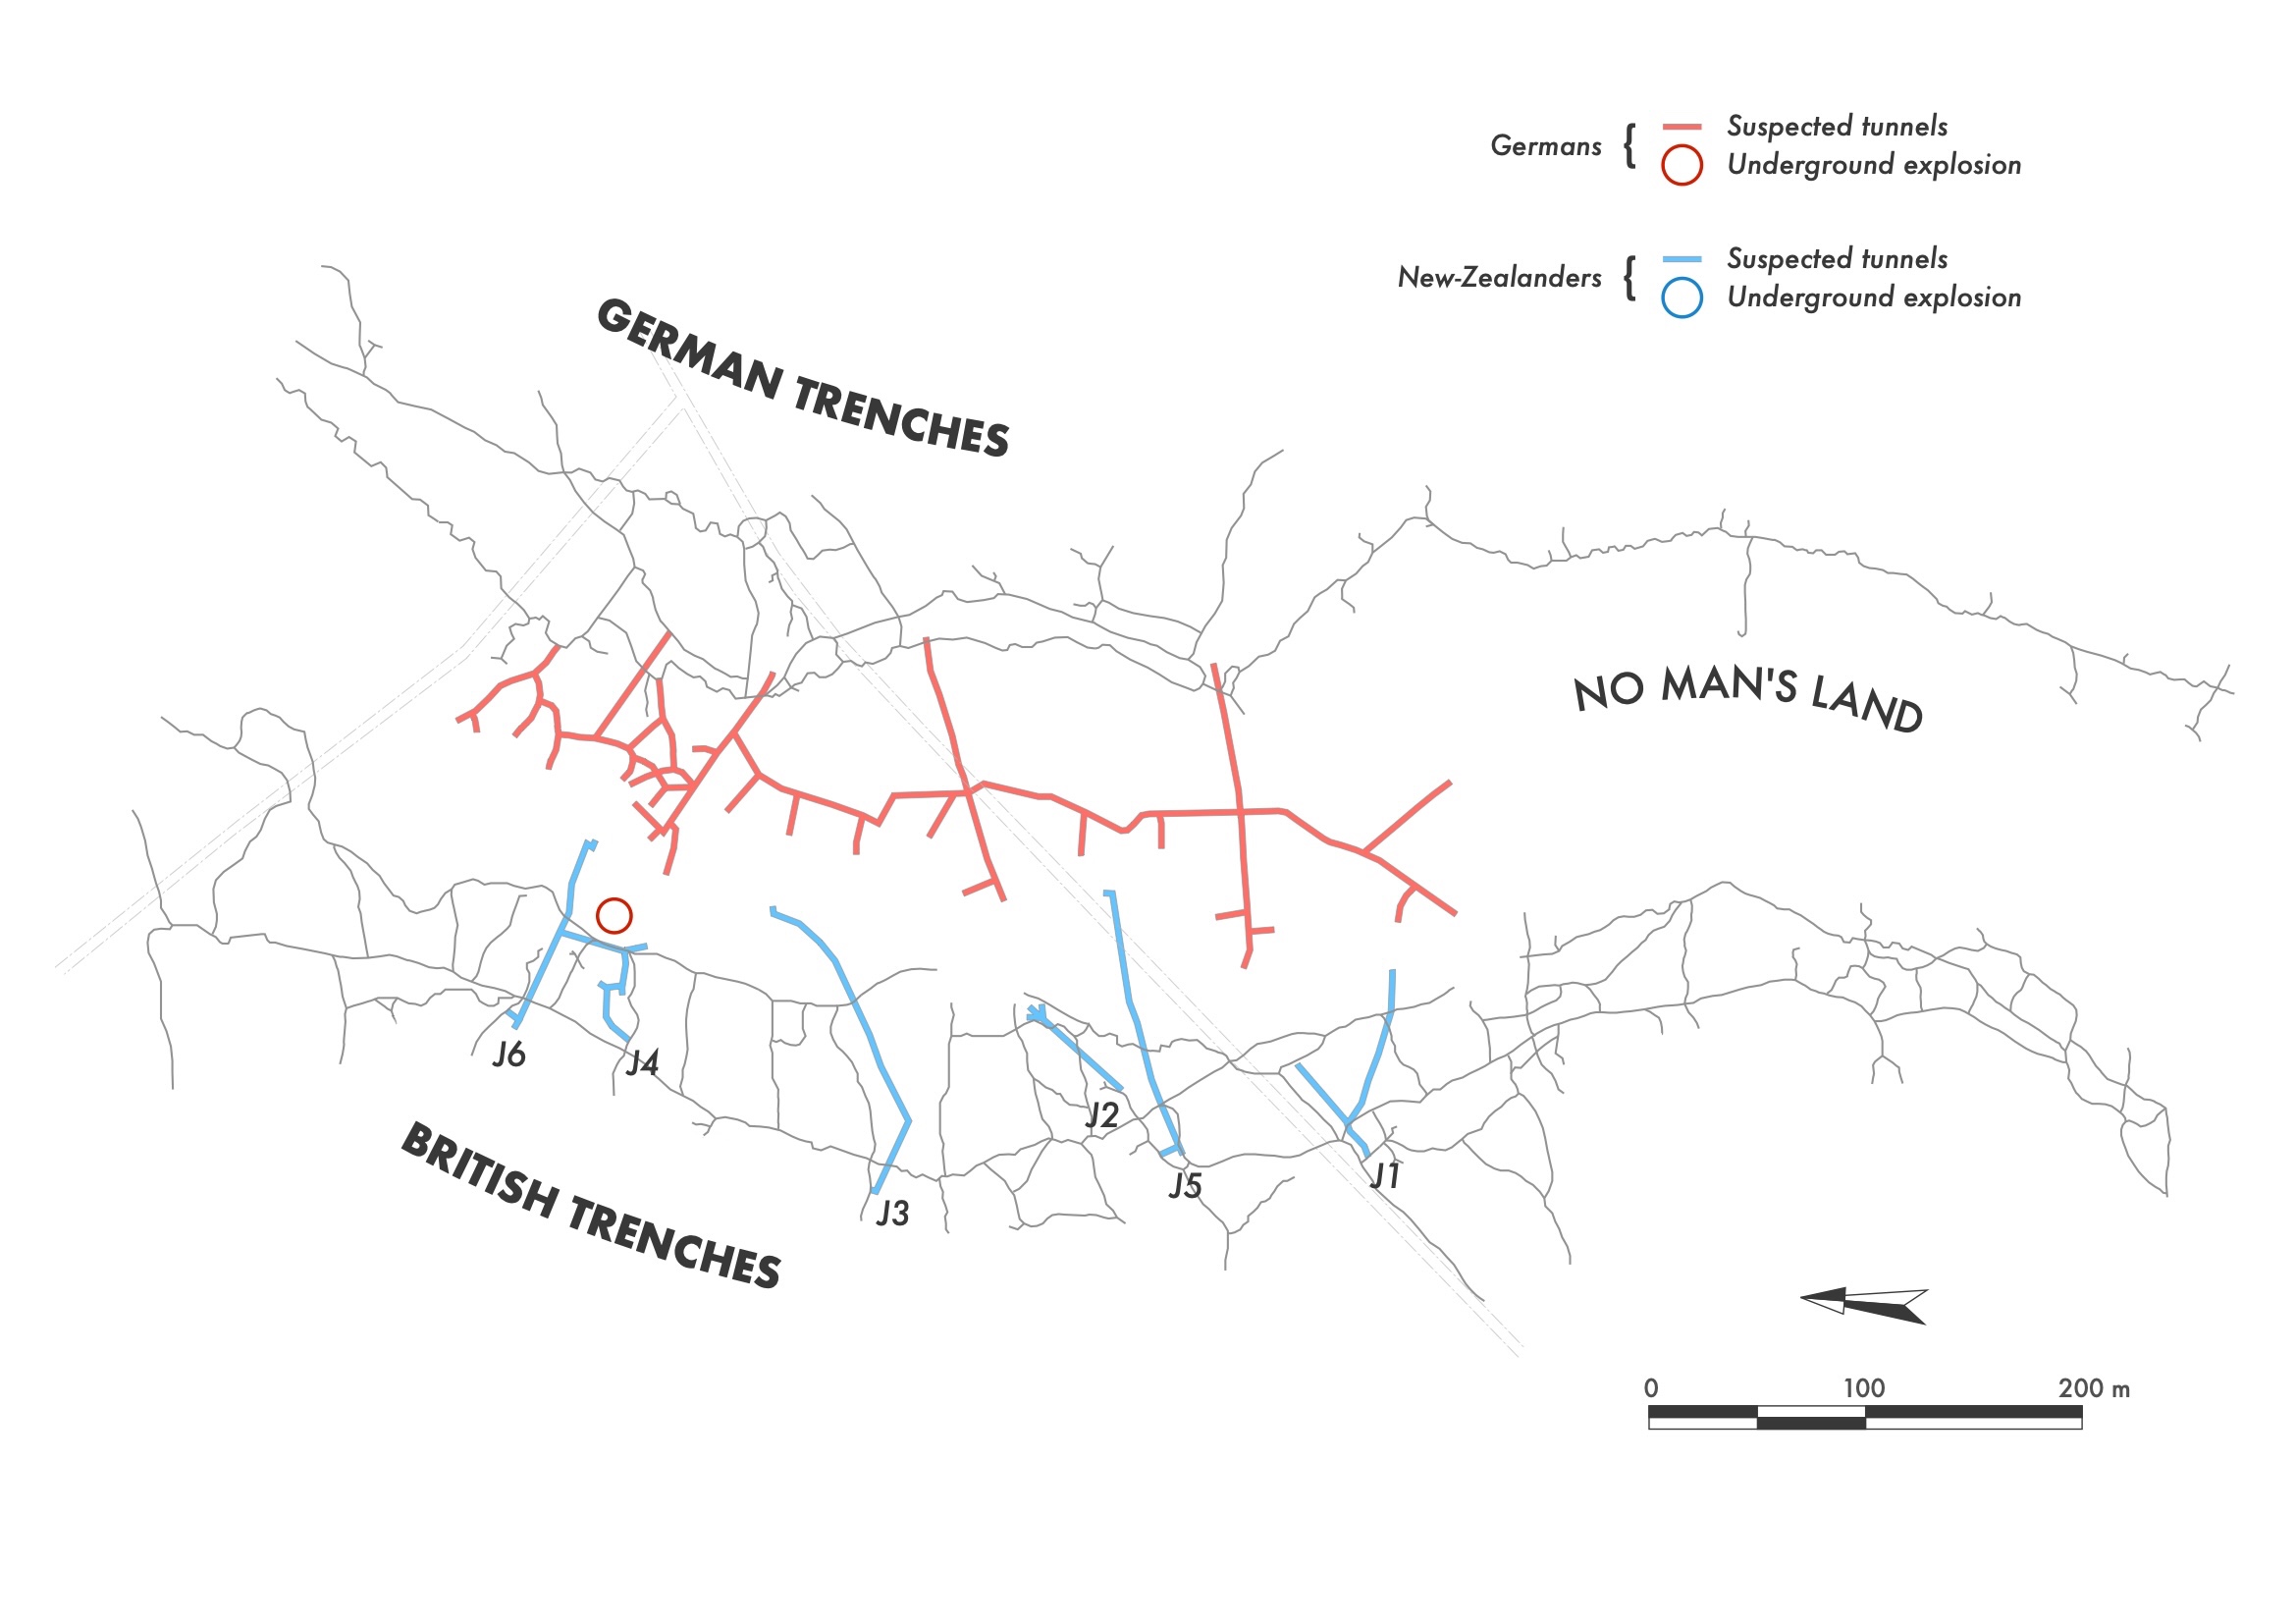
Four officers—one per section—held their ground in the front line itself, living in an underground shelter at the heart of the combat zone. The exposure was severe enough to demand a rotation of its own: three days forward, then three days’ rest in the rear. The task assigned to them was to push the enemy back towards the middle of No Man’s Land and to free the front line from the potential threat of mining. The network left by the British was confined to the northern part of Chantecler, where six main tunnels had been driven and recorded as J1 to J6—“J” being this sector’s designation in the official front-line grid used by the tunnelling companies. Only galleries J4 and J6, at the northern end of the sector, seemed to show any real organisation, linked by a communication gallery. Listening reports provided by the men of the 185th Company indicated that, in this area, No Man’s Land favoured the Germans: the ring of their picks could even be heard in the underground shelters closest to the front line.[1] The New Zealanders would extend the existing tunnels to confront their opponent directly and force him to withdraw. Further south, the ground remained untouched. To protect the trenches on the surface, an underground defensive system was being prepared—a barrier of galleries that could be blown easily if the enemy approached.
Jim and Lofty struck their first blows with the pick in one of the branches off gallery J4, carrying on the work begun by their British counterparts. From the trench they had gone down by a sloping passage some twelve metres long, which led into a shaft more than six metres deep. At the bottom of this vertical access, three short tunnels ran out at a depth of around twenty metres below the surface.[2] The candlelight, naturally reflected by the white chalk, was enough to illuminate the workings. Jim took the first shift at the face. He chipped away in short strokes at the wall in front of him, stopping from time to time to listen. The cramped space did not suit him: the narrow gallery forced him to change posture again and again—now crouching, now on his knees. Behind him, Lofty dealt with clearing the spoil. Gathering it carefully, he packed it into canvas sacks, the same kind used to strengthen the trench parapet and parados. Volunteers—very likely enticed by an extra ration—two infantrymen from the 5th Division of the British Army, holding the sector on the surface, carried the sacks back to the shaft, where they were hauled up with a windlass, then concealed in the trenches or taken away to the rear. Nicknamed the “Fatigues,” these men entered the tunnellers’ world for seven days before being replaced by other volunteers. They helped clear spoil from the galleries and carried equipment through the trenches to the various entrances of the system.[3] As one of the soldiers edged forward cautiously beside Lofty to lend a hand, a small cry came from a cage set directly on the ground. A canary sat there on its perch. By sacrificing its life, the bird would give warning of gas underground: its breathing and heart rate—faster than a man’s—meant it would feel the harmful effects sooner.[4] Despite their grim role, the tunnellers looked after their little companions every day. Jim actually liked taking on that duty at the end of his shift. He made sure to trim his canary’s claws regularly so that, if it died from gas, the little creature would not remain hooked to its perch. An English officer, intrigued by the birds, even got into the habit of visiting them; in the end he began helping Jim, who let him dole out the daily seed.[5] Underground, Lofty tapped Jim on the shoulder to signal that he was taking over at the face. Jim nodded and slid back behind his mate. To keep their presence as concealed as possible, the tunnellers avoided speaking aloud below ground. Sergeant Clarke appeared from time to time to check the progress of the work and to murmur advice into his men’s ears. He brought water flasks with him—or, more comforting still, rum. The sappers took turns until their relief arrived in the morning.
The return to Arras was by the same route, and it took the tunnellers nearly an hour to get back to their billet. That march was nonetheless welcome after the hard work of digging in galleries where it was impossible to stand upright: it allowed the men to stretch their legs, to get some air, and to savour the open air again after so long confined underground. The still-cold days of early spring made many of the tunnellers ill. Sapper Tobin even came down with pneumonia and had to be hospitalised on 15 April 1916 at Lucheux (Somme). Five days later, the officers learned of his death—the first in their unit, and also the death of the very first New Zealand soldier on the Western Front.[6]
Underground warfare imposed a specific rhythm: eight hours of work followed by sixteen hours of rest. A certain routine settled in for Jim and Lofty, both at the front and back in their quarters. Like any soldiers, they did not shirk their duties and obligations: they took part in the unit’s daily tasks, looking after equipment and their living areas. Before turning in, they always washed their uniforms, which were coated in white dust. It was a never-ending battle, because every day they came back covered in chalk from head to toe.
The German miners were the first to go on the offensive; perhaps they had noticed the arrival of their new opponent. On 7 April 1916, they blew the head of one of their galleries near J4 (Map 2), where Jim and Lofty worked at night.[7] A violent explosion occurred shortly before their arrival, at 10:30 p.m. Evacuating the network in that area, the New Zealanders closed behind them small wooden doors designed to stop the spread of gas produced by the blast. After long minutes of anxiety, every man was accounted for. The next morning, all the tunnels—except J4—were reopened and showed no damage. As a safety measure, the J4 gallery remained sealed for two days. On 10 April, the tunnellers opened it and ventilated it to drive out the lingering gas. The main tunnel had suffered some damage, but the secondary galleries were intact.[8] The sector did not seem as quiet as the men of the 185th Tunnelling Company had assumed. This action, however, did not upset the New Zealanders’ plans: to better counter their adversary, they continued expanding their network across the entire sector. The Germans remained strangely inactive after their operation. New Zealand listening reports noted no further activity. Work therefore advanced faster—especially as the tunnellers adopted their own digging method, a straightforward transposition of the movements that the recruited miners practised every day in the mines of New Zealand.
A number of the men found it difficult to remain crouched or kneeling for hours in the narrow tunnels.[9] Jim even began to feel his old back pain returning. Sapper John McManus—a committed politician in civilian life and a staunch advocate for workers—drafted and sent Major Duigan a petition signed by members of his team and other sappers. The letter asked for permission to experiment with tunnel dimensions larger than those taught at the mining school, so that the men could dig standing up and work more efficiently.[10] The major agreed to let them try, but warned that the mining inspectors would only accept it if the work was carried out faster. John McManus fully intended to deliver. The small dimensions recommended by the British were hampering the New Zealanders’ progress, and they were scarcely managing more than a hundred metres a week. By adopting their own method of working upright, the tunnellers increased that figure by half by the end of April. Better still, they set a digging record the following month, cutting more than 210 metres in a single week. After two successive inspections, the mining inspectors finally approved their method.[11] The New Zealanders were thus driving galleries a third larger than those of the British, increasing the height from 1.30 metres to 1.90 metres and the width from 0.69 metres to 1.06 metres!
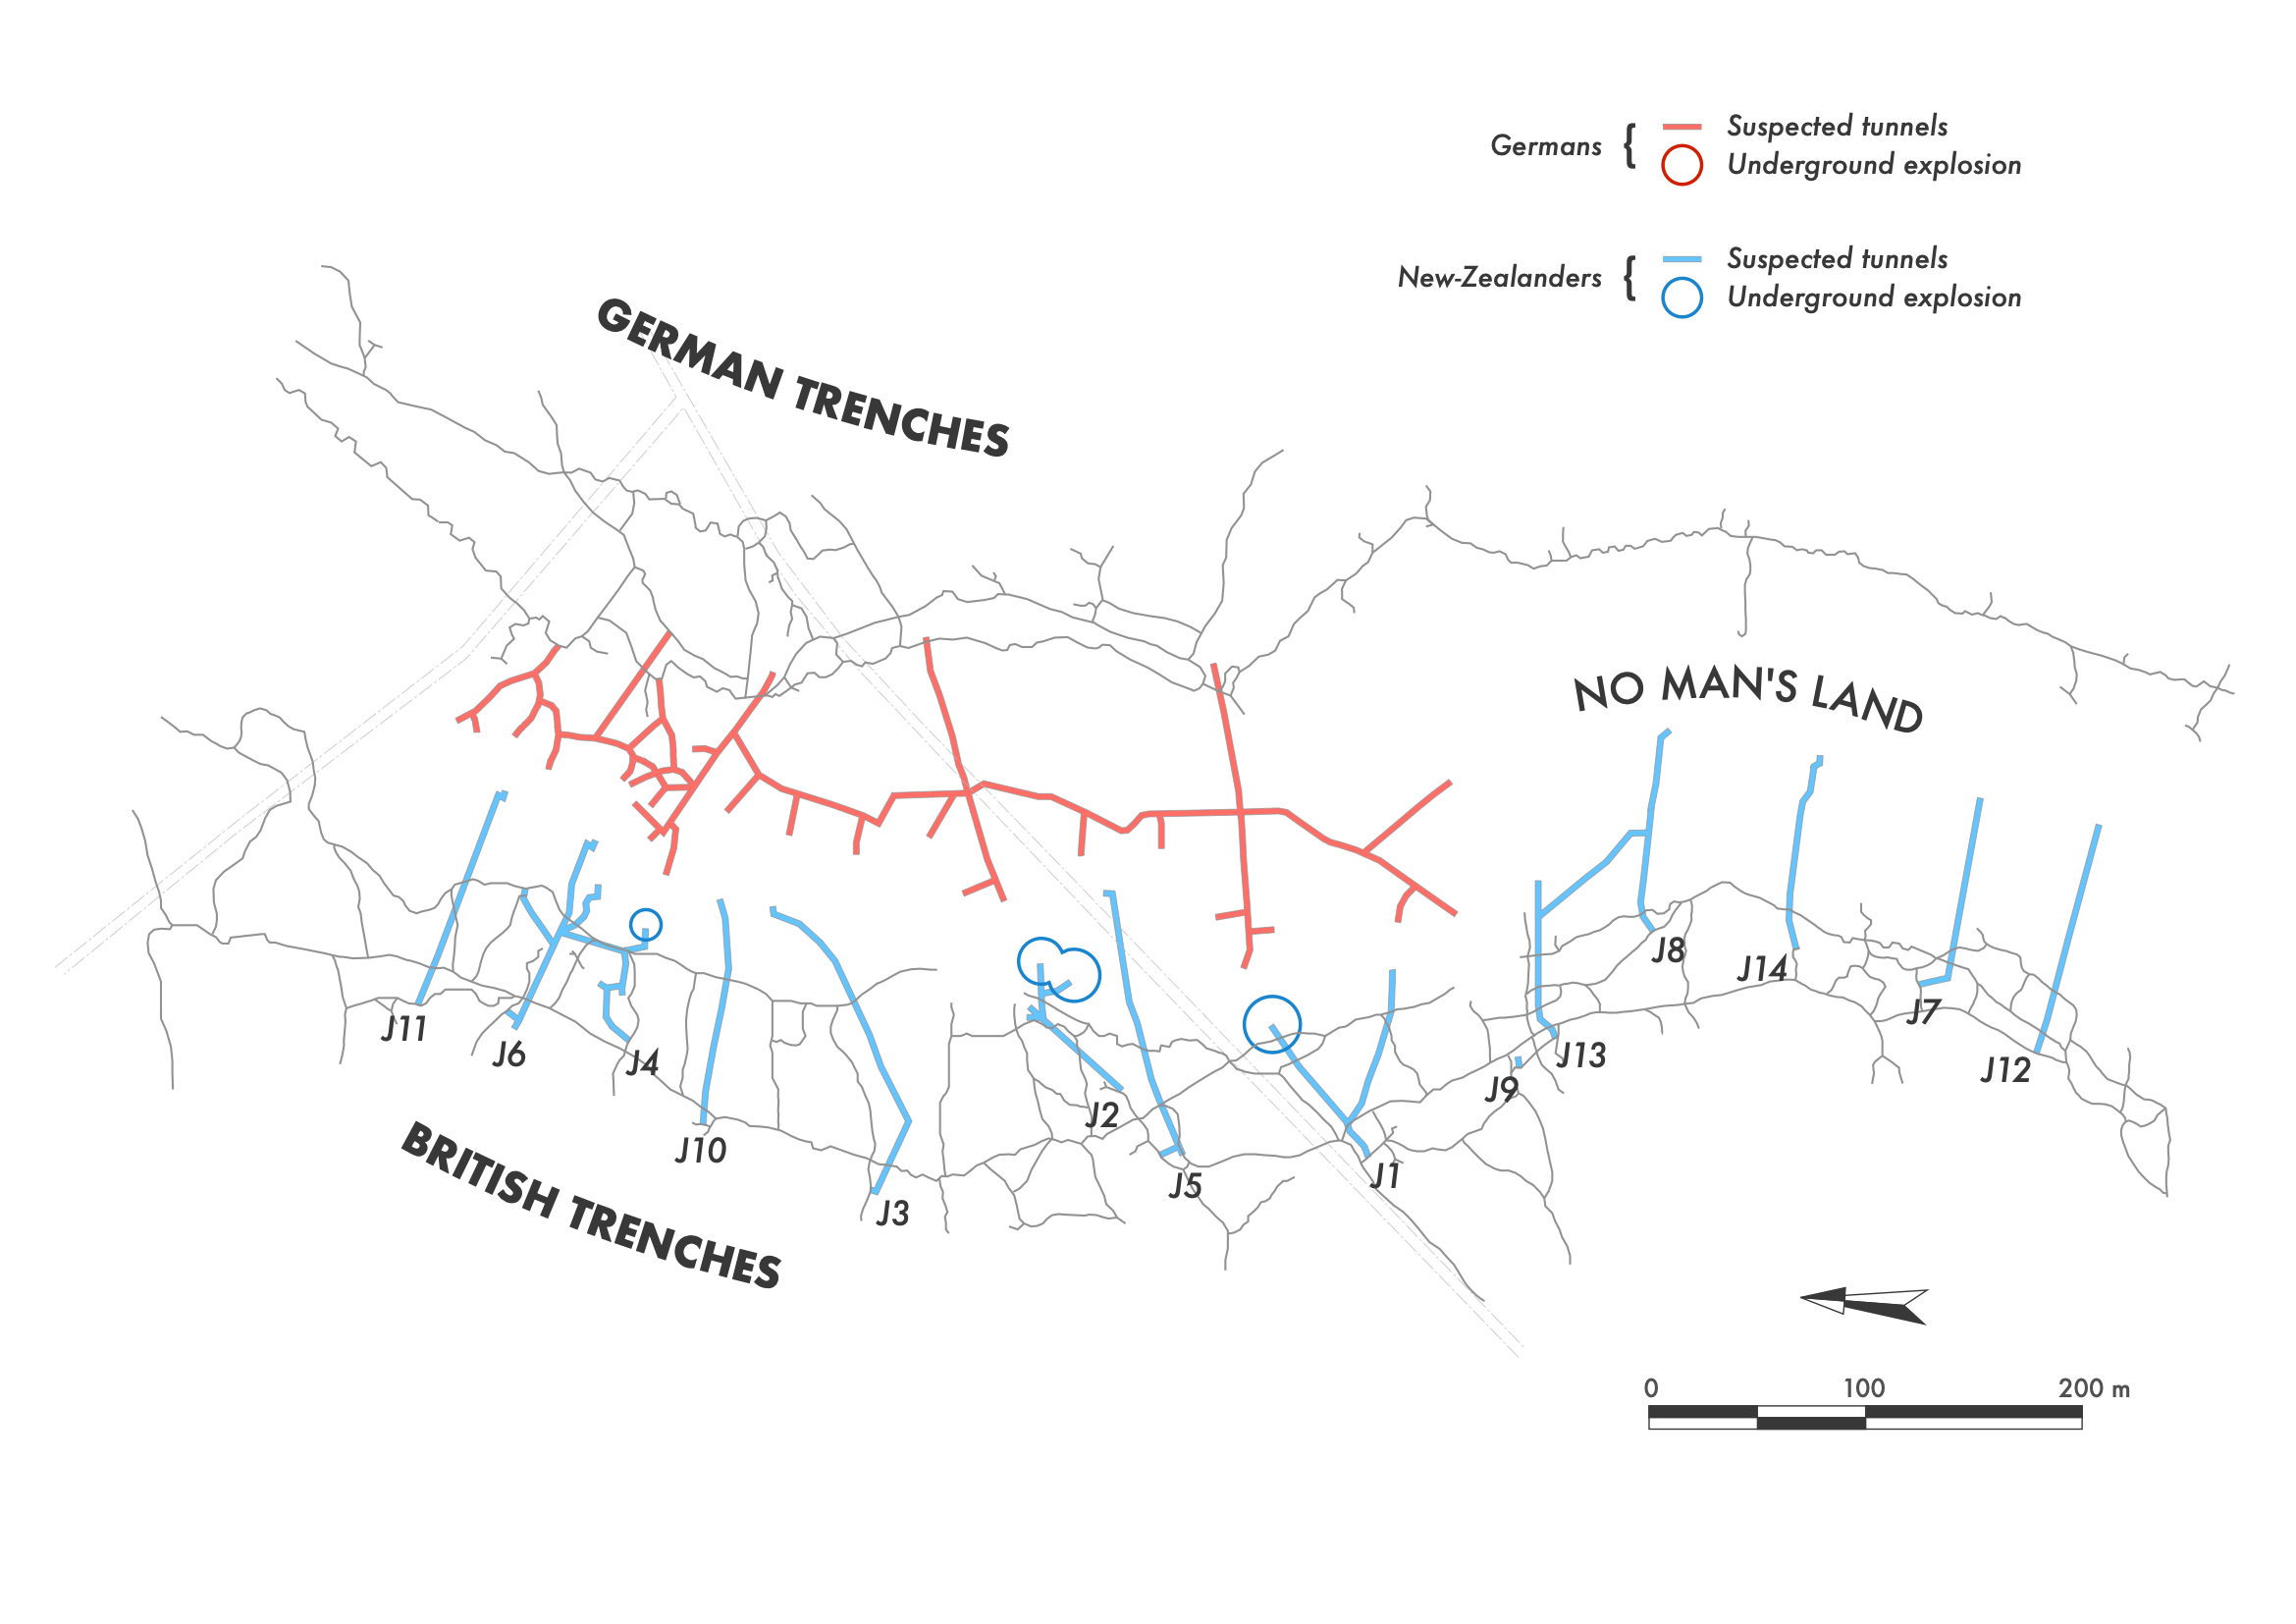
At the beginning of May, the unit planned its first attack, just as—back in the New Zealanders’ former sector—the 185th Tunnelling Company managed, at the cost of a tremendous effort underground, to overturn the advantage held by the German miners. The mistakes made by their counterparts from the Antipodes were corrected only through fierce fighting. At Chantecler, the New Zealand listening posts picked up the sound of enemy picks and, in the process, pinpointed the exact positions of German tunnels. Three areas were thus identified: one in the north of the sector near J4, and two others in the centre, near galleries J1 and J2. The officers had four camouflets prepared—small explosive charges designed to destroy or neutralise a gallery but which, unlike a mine, did not create a surface crater. Along with laying mines, this was the most common form of underground attack. One charge was placed in a branch off J4, another in one of the tunnels connected to J1, and two more in two offshoots of J2.[12]
George and Gerald, who in turn had just returned from the mining school, were thrown straight into the action. Their job was to stack the waterproof bags filled with explosive at the head of one of the J2 galleries. In total, they handled nearly a hundred of these bags—more than 1,300 kilograms of ammonal powder, a derivative of ammonium nitrate.[13] This explosive, the one most commonly used by tunnelling companies, had the advantage of being stable to handle and quick to fire. George and Gerald had not taken part in the most difficult stage, which consisted of filling the waterproof bags with ammonal. On the surface, their comrades had had to pour the powder carefully from tin canisters weighing over 20 kilograms each, since it was very messy and extremely hard to clean—especially from skin, where it left vivid yellow stains. Once the charge was emplaced, George and Gerald set the detonators and ran the electrical cables up to the surface. They then built a wall of sandbags filled with spoil. This technique—known as tamping—forced the blast forwards rather than back along the gallery, thereby preventing damage to their own network. Firing was scheduled for 5 May at 10 p.m. At H-hour, all the charges detonated successfully (Map 3). The New Zealanders, however, had no way of knowing for certain how successful the operation had been. The camouflets caused no damage in the other New Zealand galleries; only the main tunnels suffered some roof damage. The charge in J4 had been miscalculated and produced a surface crater nine metres in diameter and 4.5 metres deep.
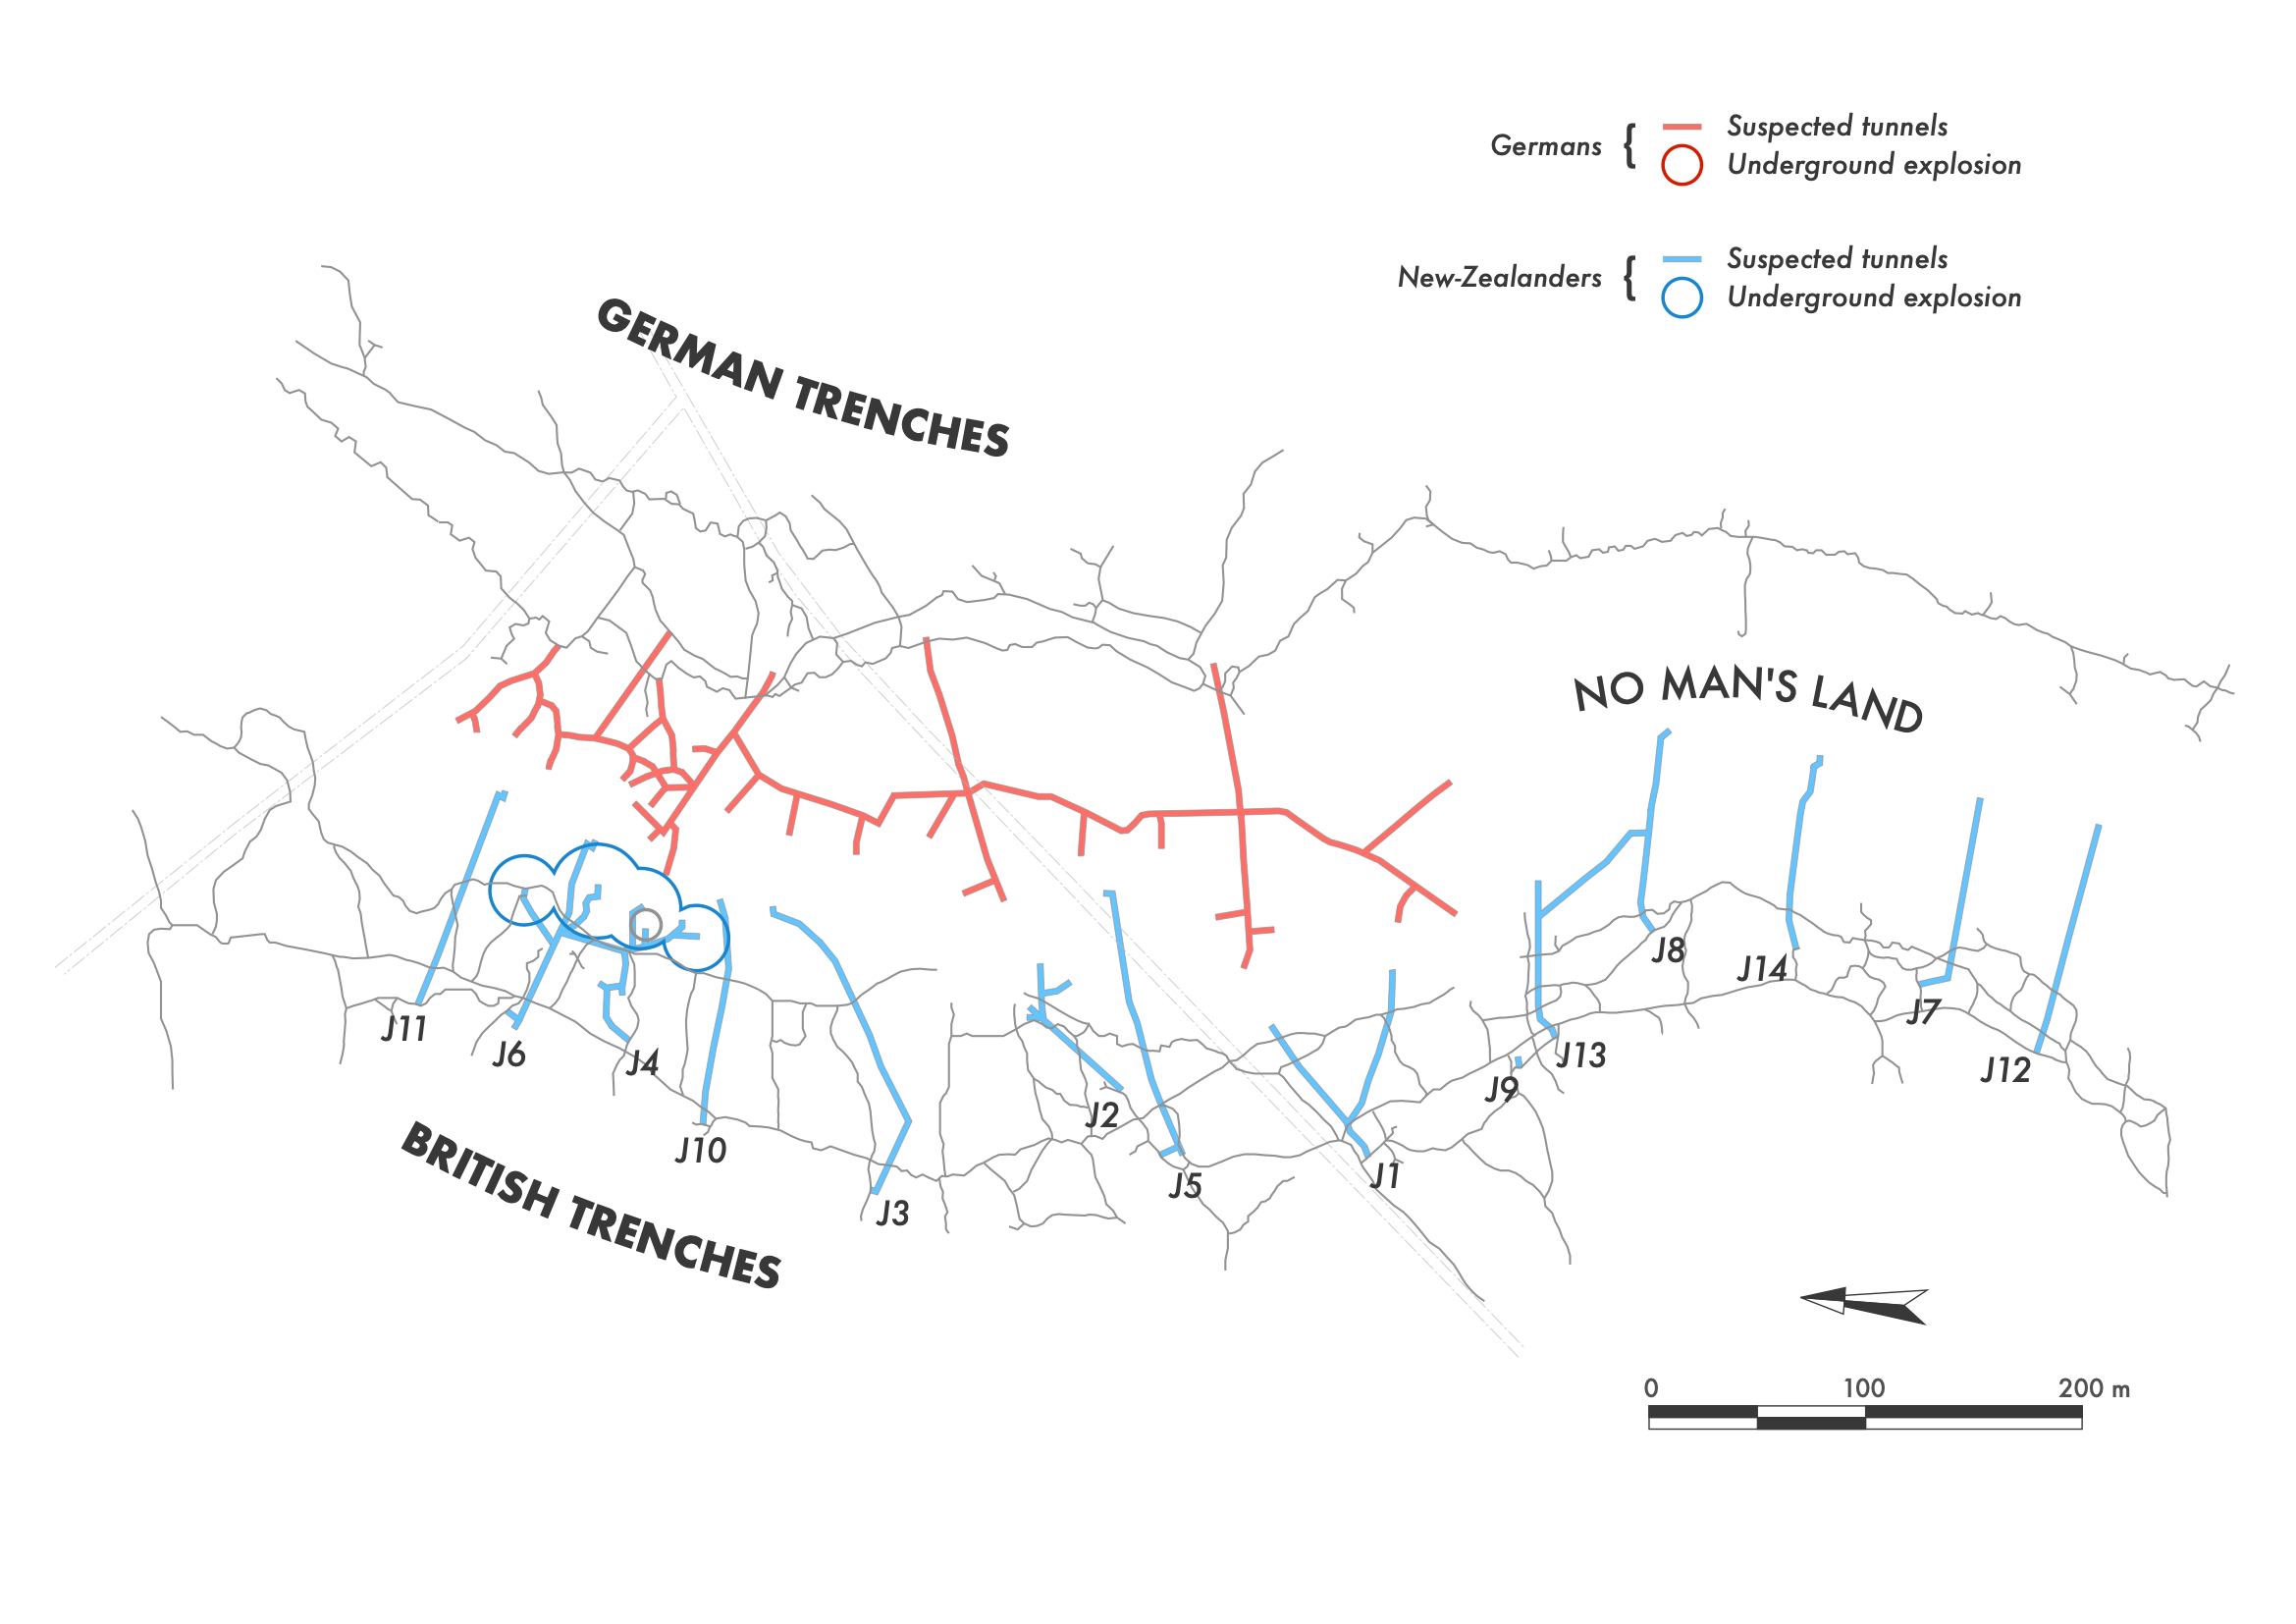
The attack seemed to have caused damage on the German side, because enemy activity could be heard clearly near the destroyed galleries. The miners were perhaps trying to rescue men trapped underground, unless they were quickly clearing their system in order to counter-attack. However, no action was taken below ground in the days that followed; only an intense bombardment was unleashed on 7 May against the British trenches for three hours.[14] No New Zealanders were reported wounded, and their tunnels suffered no damage. Underground, the Germans were still making just as much noise near J4. The New Zealanders could not be certain whether it was men actually digging or a simple decoy, since underground fighters did not hesitate to deceive enemy listening posts by imitating the sound of a pick. The tunnellers took no risks and planned a new attack: on 11 May, four camouflets were prepared around J4, and the next day they were fired (Map 4). Once again, the officers had miscalculated the weight of the charges, three of which disturbed the surface. In the days that followed, no further sound came from that area. The officers assumed the enemy galleries had been put out of action, because listening now revealed the enemy’s presence in the centre of the sector, on either side of the old Bailleul road.[15] When they detonated, the charges completely neutralised any possibility of action in that zone by the German miners, who continued their operations where their network was still close to the British lines.
In the centre of Chantecler, the New Zealand system was still under development, leaving a weak point. George and Gerald, working in that area, continued driving the galleries forward, guided by listening. By mid-May, the enemy’s activity alternated between quiet spells and hostile digging close to tunnels J3, J5, and J1, beneath the remnants of the Bailleul road. On 25 May, George and Gerald were informed—like the rest of their section—that they would be switching sectors the next day. The Section 2 was sent to Sector G, at Beaurains south of Arras, where it relieved the men of the 14th Pioneer Division. Since the tunnellers’ arrival at Chantecler, the pioneers had been placed under their authority on the southern flank, in Sectors I, H, and G, south of the Scarpe River. Up to that point their work had been kept to the bare minimum: developing a defensive network and monitoring ground the Germans were not yet thought to have mined. Yet by late May, the pioneers detected them near one of their galleries.[16] The New Zealand unit’s officers dispatched the 2nd Section—more experienced than the pioneers—in anticipation of underground fighting beginning in that area. The number of tunnelling companies was still insufficient to cover the entire British front.
The New Zealand unit lost nearly 80 men, and its work no longer progressed as quickly—especially since the enemy miners made an unsuccessful attempt to attack near J4.[17] The Germans were therefore still present in the north of Chantecler. The New Zealanders were trying to pinpoint them when enemy artillery began an intense bombardment on 2 June. All day long, shells rained down on the British trenches.[18] Underground, the tunnellers struggled to listen, misled by the vibrations of the surface explosions. On the night shift, Jim and Lofty could not dig: it was impossible to bring the spoil up to the surface. They hunkered down in their galleries, waiting for the morning relief. The pounding continued without interruption on 3 June. Listening posts revealed no sign of enemy activity.[19] Even if everything seemed quiet underground, the sector entered its third day of bombardment on 4 June. By evening the shells were still falling. Suddenly, at 9 p.m., four heavy mines exploded. The ground shook. The earth rose into the sky. Three huge craters opened in the centre of Sector J (Map 5). The blasts of the two northernmost mines hurled up so much chalk that the British front line trenches were buried; the southernmost crater caused the front to collapse. Another crater formed on the northern flank, in Sector K held by the men of the 184th Tunnelling Company. The German shelling had therefore served to mask the final preparations for their underground offensive. The New Zealanders, in their tunnels at the moment of the attack, fled as fast as possible to the surface. In No Man’s Land, German infantry had surged forward; helped by the new craters, they were already forcing their way into the British lines. As they emerged, the tunnellers who had been working beneath the Bailleul road saw British soldiers running toward the front line. A cloud of white dust still hung in the air. Rifle fire cracked. Bullets whistled. The New Zealanders caught sight of German soldiers pouring into the British trenches.[20] Pulling back from the front, they only learned the next morning that the Norfolk and Royal Warwickshire regiments had repelled the raid at the cost of heavy losses.[21] That night, Jim and Lofty stayed in their quarters in Arras, listening to the accounts of comrades who had had a narrow escape. When the first New Zealand teams returned to Chantecler, they found a landscape utterly transformed by the three massive craters—like white gashes across the muddy earth of No Man’s Land. Lifeless bodies lay on the battlefield, while the faces of the survivors showed deep exhaustion. Underground, the network had collapsed in several galleries close to the craters. It took four days to repair and shore them up.
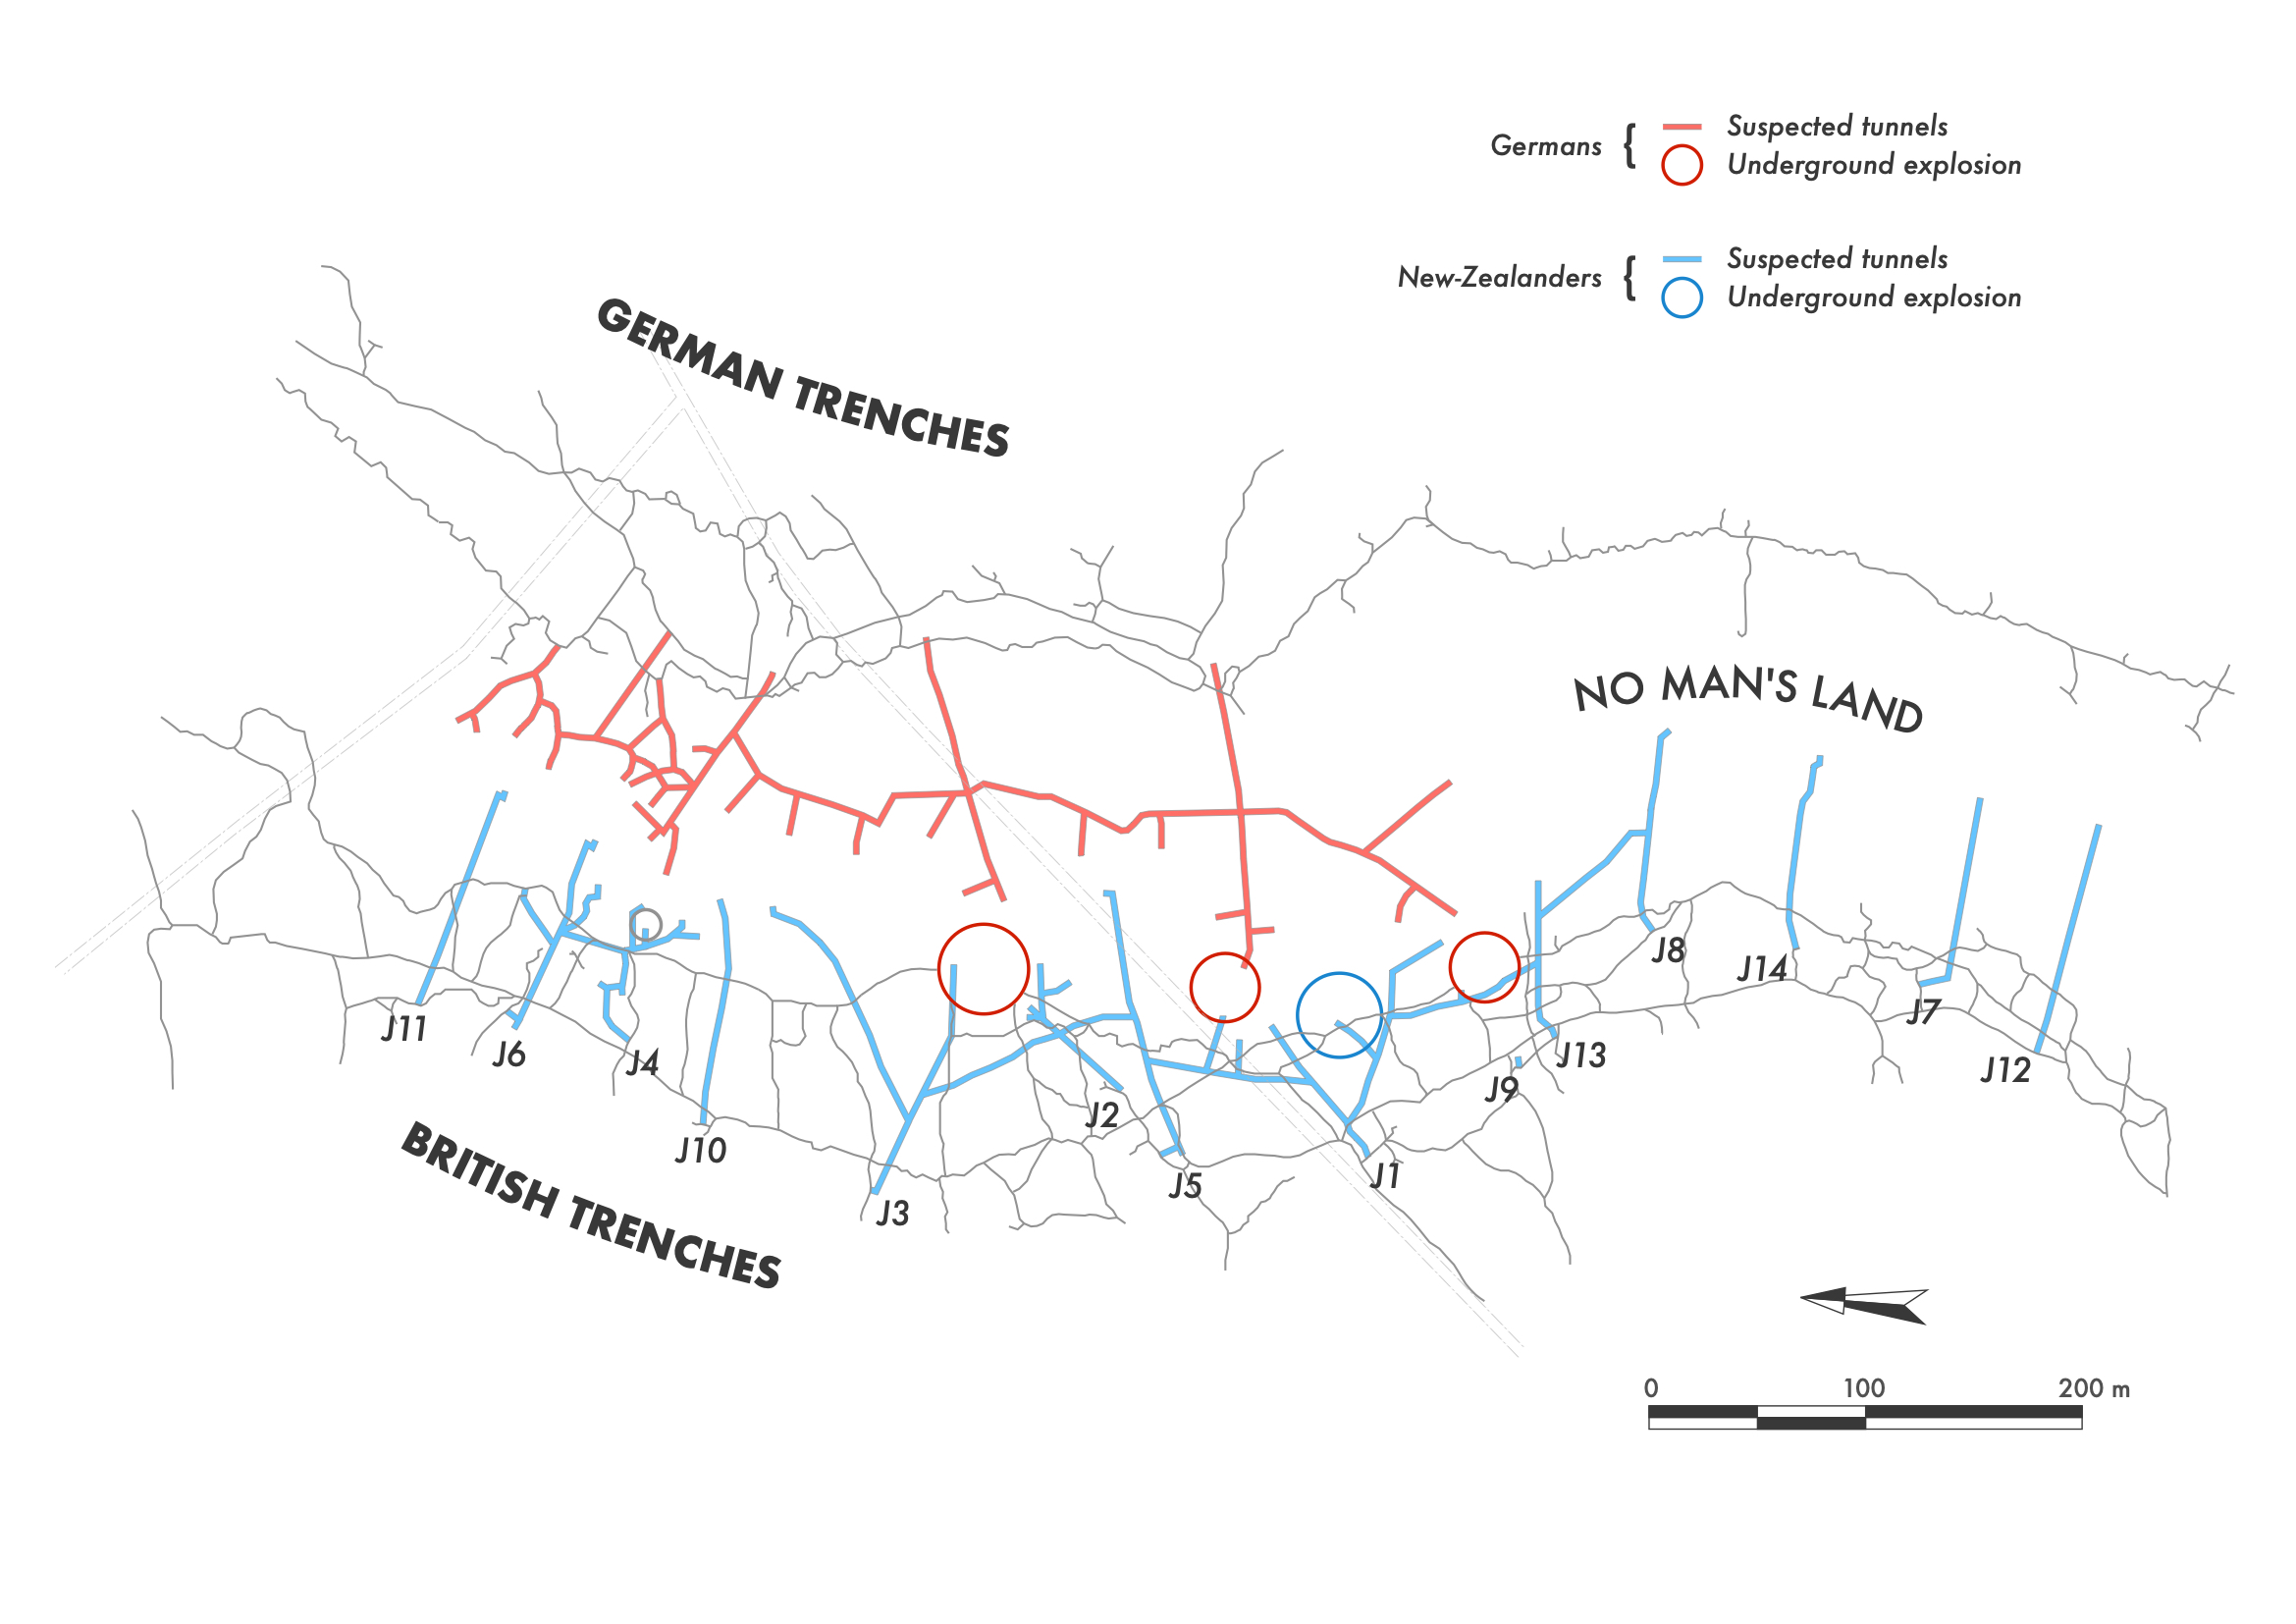
The officers examined the three craters and christened them Cuthbert, Clarence, and Claude, after the humorous popular song by Arnold Blake, composed in 1912.[22] Cuthbert was the name given to the southernmost crater, which measured more than 43 metres across and reached a depth of over 7.5 metres; according to the officers, the mine had probably been laid at a depth of more than 16 metres. Clarence, the smallest of the three, lay close to the old Bailleul road; it formed an oval more than 41 metres wide and over 9 metres deep, a shape suggesting that the explosive charge had been placed along the line of the gallery. Claude, the northernmost and the largest, reached a diameter of nearly 45 metres and a depth of more than 11.5 metres; the officers assumed the mine had been installed more than 24 metres underground. At Chantecler, the New Zealand company suffered its second setback and found it very difficult to conduct an effective underground fight. As a precaution, on 16 June at 2:00 p.m., a camouflet was fired in one of the branches of J1, south of Clarence, to prevent a further enemy attack on the front line (Map 5). Nevertheless, at no point had the New Zealanders managed to pinpoint the enemy workings: the German miners had simply drawn their attention to the northern part of the sector throughout April and early May. That period gave them enough time to edge as close as possible to the British front line and to plan an attack in coordination with the troops on the surface.
Chapter 7
TrappedNotes
- 1.
Herbert W. Graham, The Life of a Tunnelling Companies, Being an intimate Story of the Life of the 185th Tunnelling Company Royal Engineers, in France, during the Great War, 1914-1918, Hexham, J. Catherall & Co., 1927, p. 22.
- 2.
Imperial War Museum, Documents.11515, The First World War Memoirs of James Williamson, Part 1, f° 31.
- 3.
The Work of the Royal Engineers in the European War, 1914-19, Military Mining, Uckfield, The Naval & Military Press Limited, 2004 (orig. ed. 1922), p. 5.
- 4.
Grant W. Grieve and Bernard Newman, Tunnellers: The Story of the Tunnelling Companies, Royal Engineers, during the World War, London, Herbert Jenkins Limited, 1936, p. 311.
- 5.
Imperial War Museum, Documents.11515, The Memoirs of James Williamson…, op. cit., Part 1, f° 32.
- 6.
The National Archives United Kingdom, WO 95/407, New Zealand Tunnelling Company War Diary, 20 April 1916, “Received word to-day of first death among members of Coy. No.4/1639, Sapper M. Tobin.”
- 7.
Ibid., 7 April 1916, “Enemy blew at J4. at 10.30.p.m. evidently against our left branch.”
- 8.
Ibid., 10 April 1916, “Opened up J4. at 1 p.m. and found that the central gallery had sufferred some damages from German camouflet of 7/4/16 but that right and left branches were not affected.”
- 9.
Bernard Preston, Hard Times on the Chain Hills, s.l., McManus Family, 2006, p. 17, “This was to keep them as small as possible, which meant all the underground work was to be undertaken while down on the knees, the diggers at the head were expected to dig tunnels no more than three feet high and those pushing the soil out were also down on their knees […] Many of the men had already reported sick with swollen knees and strained backs.”
- 10.
Ibid., “… they estimated they could dig twice the distance each shift and possibly more as fewer men would report sick.”
- 11.
Ibid., “They more than doubled the distance previously completed and the physical condition of the men was greatly improved.”
- 12.
The National Archives United Kingdom, WO 95/407, War Diary…, op. cit., 1-2 May 1916, “Decided on a scheme of attack based on recent location of enemy […] Decided to load up J1.2, J2.11, J2.3”.
- 13.
James Campbell Neill, The New Zealand Tunnelling Company, 1915-1919, Auckland, Whitcombe & Tombs, 1922, p. 47, “… a grey inoffensive looking powder of tremendous power.”
- 14.
The National Archives United Kingdom, WO 95/407, War Diary…, op. cit., 7 May 1916, “At 2/30 p.m. enemy opened up a very severe bombardment of our trenches and lines lasting til 5-30 p.m. No damage was done to our mine heads and we had no casualties.”
- 15.
Ibid., 12 May 1916, “… cutting off all German galleries which might have existed under our frontline. Enemy mining going on actively outside J1-1 and J1-5.”
- 16.
Ibid., 21 May 1916, “Enemy active […] South of Scarpe near G14. Work in G14 stopped in consequence.”
- 17.
Ibid., 30 May 1916, “An explosion, believed to be a Camouflet, was felt early this morning apparently off j4 but not definitely located. It did no damage.”
- 18.
Ibid., 2 June 1916, “Our J Sector trenches heavily strafed”.
- 19.
Ibid., 3 June 1916, “Mining quiet during day but heavy strafe going on.”
- 20.
Ibid., 4 June 1916, “We lost no men-had narrow escape in J13.”
- 21.
James Campbell Neill, The New Zealand Tunnelling Company…, op. cit., p. 49, “The Norfolks and Warwicks suffered some casualties in the trench fighting before the Germans were driven out”.
- 22.
Ibid., “They were christened Cuthbert, Clarence and Claude in honour of a then popular revue.”
How to cite this page
Anthony Byledbal, “Chapter 6: In the Heart of Battle”, in Kiwis Dig Tunnels Too, New Zealand Tunnellers, 2017. Available at: